
Press
Samples
Hello lovely readers. Five-free indie stamping
polish brand Moonflower
Polish has added stamping holographic glitter to its offering.

These holographic microglitters can be used for a
new stamping technique called pigment and glitter stamping. If you have success
stamping with a clear stamper, then this technique is for you!
There are multiple ways of applying these. I prefer
the textured look-and-feel of the microglitter, so I will describe what worked
for me to achieve this look.
TO USE:
Start by priming your clear stamper with a coat of microglitter. You can gently
rub the glitter onto the stamper using a makeup applicator (provided). Next,
you apply your polish of choice onto your stamping plate. Scrape off the excess
polish and pick up your image with your primed stamper.
You can use stamping polish as well as non-stamping
polish and clear top coat.
I stamped using the following from left (index
finger) to right for the first set
of swatches: clear top coat, white stamping polish (Moonflower Polish
Dia), black stamping polish (Moonflower Polish
Noche), and a color coordinated polish.
For the second
set of swatches, I used a coordinated color (violet and blue) or clear
top coat (silver) throughout. Items used include stamping plates from Moyou
London, Pet’la Plates, and Ejiuba and clear stampers from Ejiuba.
Silver holographic microglitter
 |
| Silver microglitter |
 |
| Stamped from left to right with: clear top coat, white stamping polish, black stamping polish, and silver holographic polish |
 |
 |
| Stamped with clear top coat |

Light blue holographic microglitter
 |
| Light blue microglitter |
 |
| Stamped from left to right with: clear top coat, white stamping polish, black stamping polish, and silver holographic polish |
 |
 |
| Stamped with light blue stamping polish |

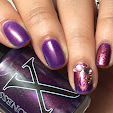
Violet holographic microglitter
 |
| Violet microglitter |
 |
| Stamped from left to right with: clear top coat, white stamping polish, black stamping polish, and silver holographic polish |
 |
 |
| Stamped with violet stamping polish |

TIPS: Color-coordinate your glitter and stamping polish for a bold look or use black stamping polish to transform your glitter. Also, use a protective barrier around your cuticles for easy clean up.


Overall, I love these microglitters and stamping
technique. It is not a beginners technique, but if you have stamping plates
that work well with a clear stamper, then you will be able to achieve these
looks as well.
Currently, Moonflowe Polish carries 12 different
microglitter shades. The glitters come in 2.5g pods along with an applicator.
These will retail for $5 US and will be available for purchase starting
Nov 23. There will also be a 5mL mini bottle of the black stamping polish Noche available for $2 US.
Use my code LACQUER10 for 10% off your purchase at www.moonflowerpolish.com, and make sure to follow on social media for the latest news on releases and restocks.
The product featured here was sent to me free of charge in exchange for my honest review. All opinions expressed are my own.


You are so good in nail arts
ReplyDeleteThese are all so pretty!
ReplyDeleteYou are so talented with stamping. It has to be harder with the glitters.
ReplyDeleteI just got some of these! I'm nervous to try them out, but the pay off in the design is worth it - I mean, look at these looks you put together! <3
ReplyDeleteThese are really pretty, and this is a stamping technique I haven't tried yet. I'm definitely intrigued!
ReplyDeleteThat's a really cool technique. Definitely keeping that in mind!
ReplyDeleteThat is a really interesting new technique. I always wonder who thinks up these amazing things to do.
ReplyDeleteI'm tucking this info away for later. Thanks for sharing the technique!
ReplyDeleteThis is so cool! I’ve never heard of doing this before. I love the way yours turned out as well!
ReplyDeleteLove the roses you made with the violet holo glitter. I wish I had the skills - and steady hands - to do something like this, but all I'll get is a mess of glitter, and spills everywhere LOL.
ReplyDeleteThey're all really pretty! This is definitely above my skill level, lol.
ReplyDeleteYou created so many fabulous looks with these glitters!
ReplyDeleteI totally need to see a video haha. So confused how this worked!
ReplyDeleteThis is such an interesting nail art idea!
ReplyDeleteYour nail art is gorgeous!
ReplyDeletesparkly!
ReplyDeleteThis is such a neat idea! I have got to get a few glitters and try it out.
ReplyDeleteI'm enjoying these microglitters entirely too much!
ReplyDelete